
Payout Report Component
Embed the Rainforest Payout Report Component to show merchants their payouts
Early PreviewThis feature is currently in Beta. Please contact Rainforest support or your Platform Success Manager for more information on Payouts.
The Payout Report Component shows a merchant's payouts and all the details to manage the payout. Unlike a deposit, a payout is an amount from the merchant's available balance rather than a group of payments, so payout details do not include a payment-level breakdown.
The Payout Report Component can be embedded in one of two ways:
- With scheduling: The merchant schedules and cancels payouts directly from the report.
- As a report only: The report shows the merchant's payouts, while your platform creates the payouts in another way, such as through the API or the Payout Schedule Component in your own experience.
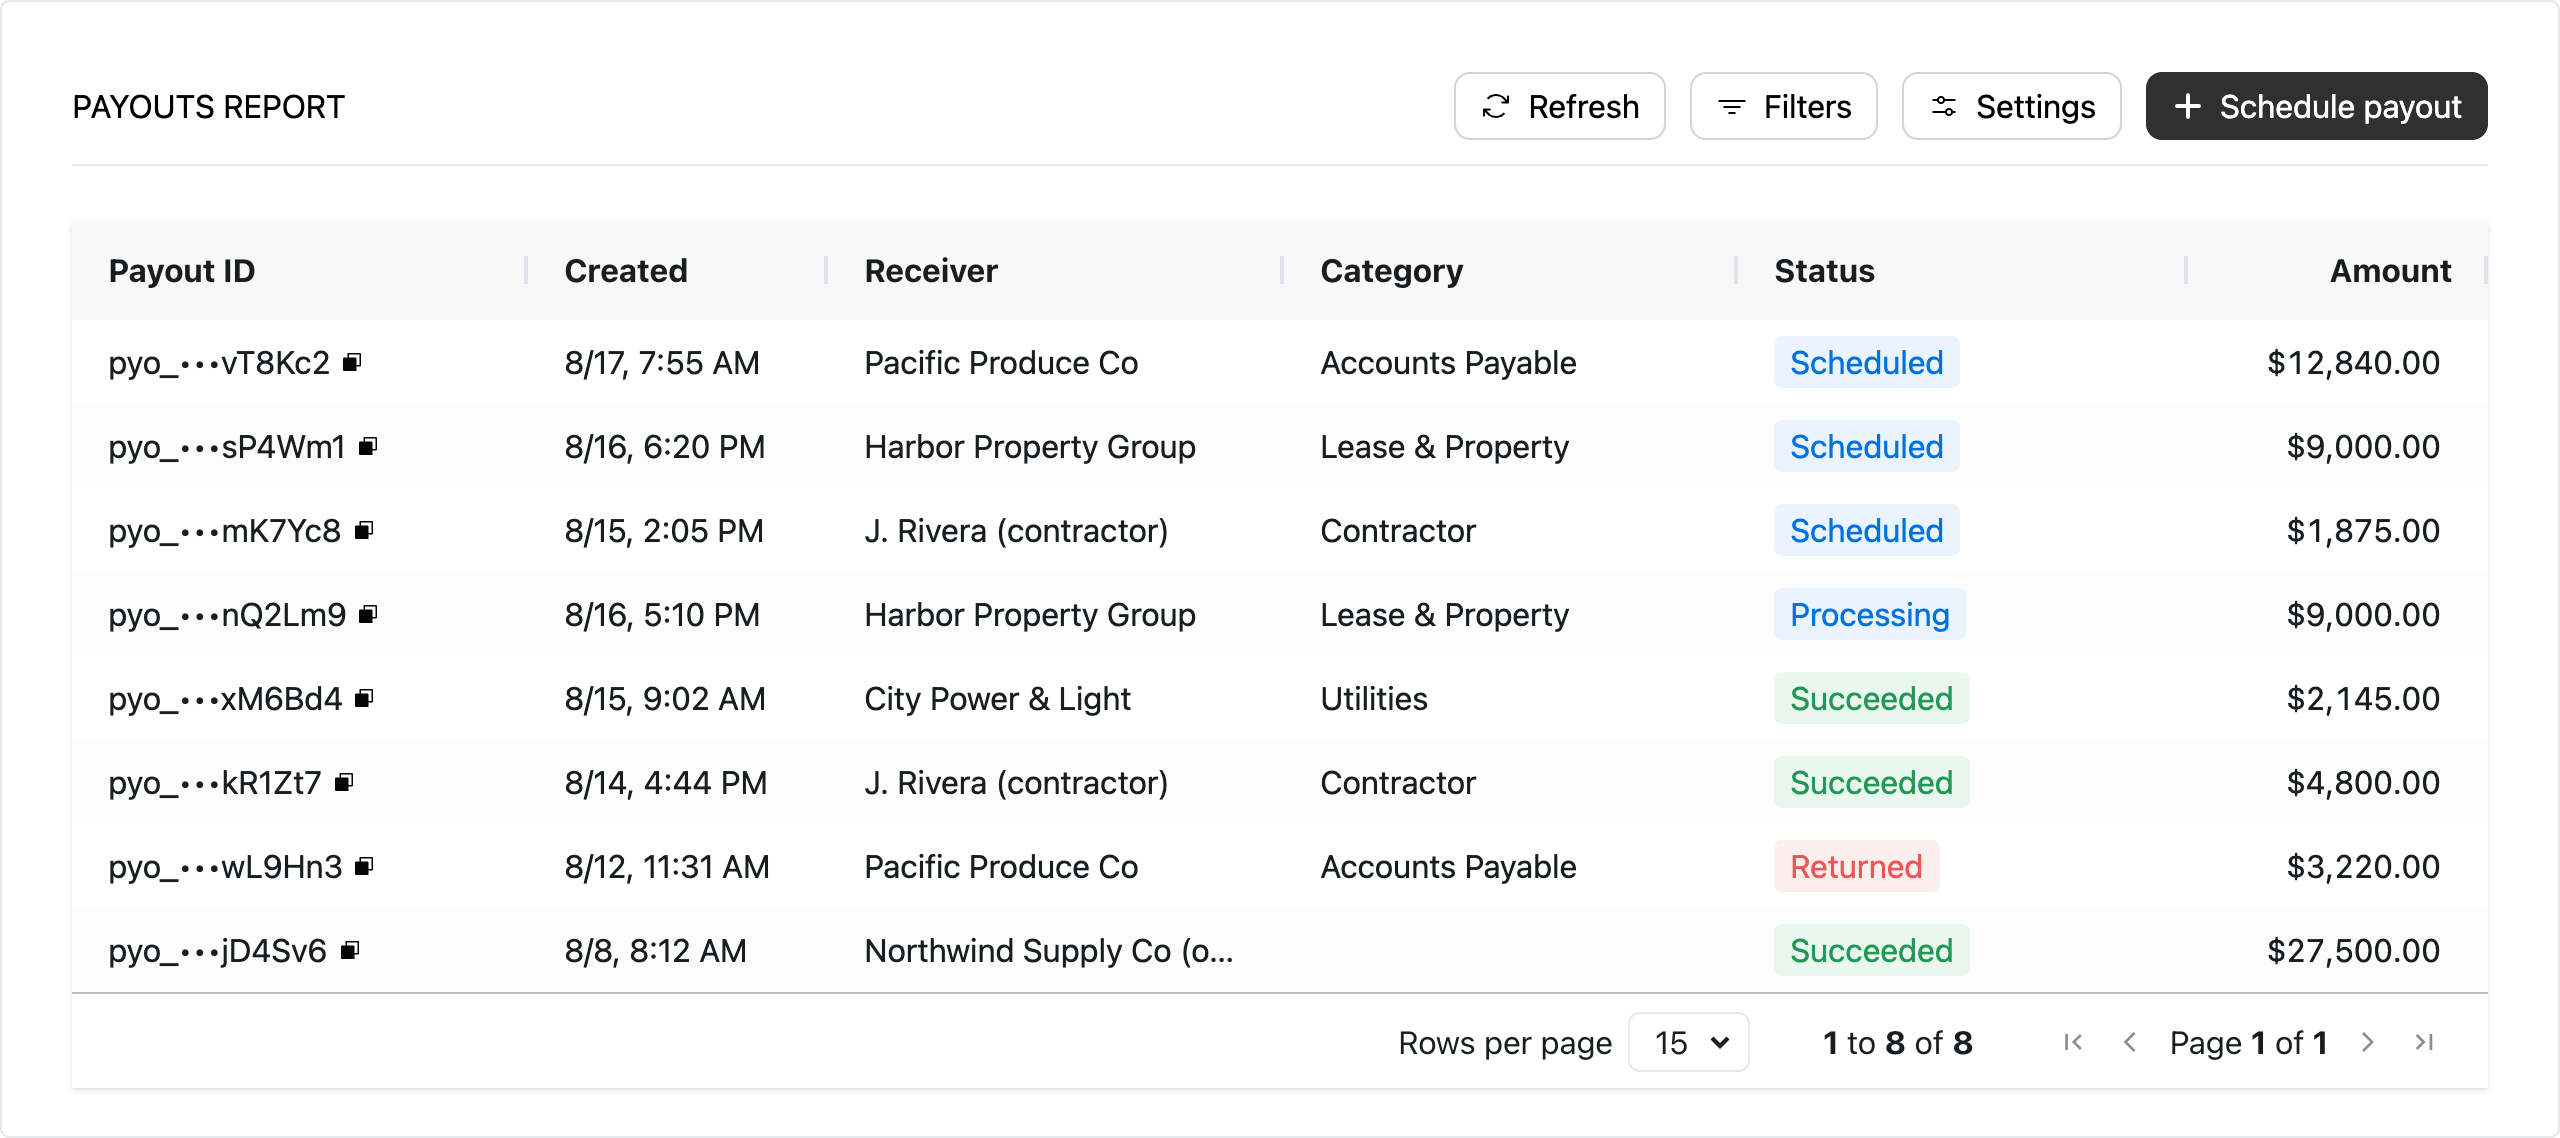
To compare the various options to integrate payouts, see Payout integration options.
The payout report does not include payout receiver management. Merchants will need another way to add payout receivers. See Payout receiver integration options.
How to embed a payout report
Session authentication
Create a session to grant the Payout Report Component permissions to view and action payouts. The session should include at least the following permissions to view payouts:
curl --location 'https://api.rainforestpay.com/v1/sessions' \
--header 'Content-Type: application/json' \
--header 'Authorization: Bearer {{api_key}}' \
--data '{
    "ttl": 86400,
    "statements": [
        {
            "permissions": ["group#payout_report_component"]
        }
    ]
}'
Session constraints
If the component permissions are constrained to a specific resource, data filters will need to be applied to give the Payout Report Component the same level of permissions.
Commonly, the payout report is pre-loaded to show payouts for a single merchant. The session should be constrained to a specific merchant to ensure this session only has permissions to view the payouts associated to the merchant:
curl --location 'https://api.rainforestpay.com/v1/sessions' \
--header 'Content-Type: application/json' \
--header 'Authorization: Bearer {{api_key}}' \
--data '{
    "ttl": 86400,
    "statements": [
        {
            "permissions": ["group#payout_report_component"],
            "constraints": {
                "merchant": {
                    "merchant_id": "REPLACE_ME"
                }
            }
        }
    ]
}'
Action permissions
If the merchant should be able to schedule or cancel payouts from the report, then the session should include the permission group for each action, and the component should include the matching action in the allowed-actions prop.
| Session permission group | What it allows | Component allowed actions |
|---|---|---|
payout_report_component.create_payout | Schedule a payout to a payout receiver | schedule-payout |
payout_report_component.update_payout | Cancel a scheduled payout | cancel-payout |
{
    "ttl": 86400,
    "statements": [
        {
            "permissions": [
                "group#payout_report_component",
+               "group#payout_report_component.create_payout",
+               "group#payout_report_component.update_payout"
            ],
            "constraints": {
                "merchant": {
                    "merchant_id": "REPLACE_ME"
                }
            }
        }
    ]
}
JavaScript bundle
Include the merchant JavaScript bundle in your frontend to access the Payout Report Component.
<script type="module" src="https://static.rainforestpay.com/sandbox.merchant.js"></script>Content security policy (CSP)
Content Security Policy (CSP)If your webpage uses a Content Security Policy to control what code is allowed on the page, you must make changes to allow the Rainforest Components to load.
You will need to update your Content Security Policy for
script-srcandframe-srcdirectives to include:*.rainforestpay.com
Payout Report Component
Add the Rainforest Payout Report Component with custom configuration designed in the component studio.
<rainforest-payout-report
  session-key="REPLACE_ME"
  data-filters='{"merchant_id":"REPLACE_ME"}'
  allowed-actions="schedule-payout,cancel-payout"
></rainforest-payout-report>
Customize the component
Head over to the Component Studio for more attributes you can provide to customize the component’s appearance and behavior.
UI customization
Rainforest supports customizing the following UI in the Payout Report Component through the exposed slots.
Available slots
| Name | Description |
|---|---|
details-loading-indicator | Overrides the default "Loading..." UI shown while payout details load |
<rainforest-payout-report>
    <div slot="details-loading-indicator">
        (your custom UI markup)
    </div>
</rainforest-payout-report>
Prop configuration
Rainforest supports prop attributes to configure the Payout Report Component with various functionality and styling. See the Component Studio for a full list of attributes and valid values.
Style
The component takes the same style-* attributes as all the other Rainforest components, such as style-accent-color, style-button-color, and style-font-family.
Allowed actions
Use allowed-actions to choose which actions are available to the merchant, as a comma-separated list. Each action also needs its respective permission group in the session. Not specifying allowed-actions will embed the component in a read-only view.
| Action | Description |
|---|---|
schedule-payout | Schedule a payout to a payout receiver. Report must be filtered to a specific merchant and requires a merchant_id in data-filters. |
cancel-payout | Cancel a scheduled payout. |
<rainforest-payout-report
    allowed-actions="schedule-payout,cancel-payout"
></rainforest-payout-report>
Column configuration
The Payout Report will load with a set of default columns. Omit the columns to use the defaults.
Default columns for the Payout Report:
[
    {"name": "Payout ID", "type": "builtin", "value": "id"},
    {"name": "Created", "type": "builtin", "value": "created"},
    {"name": "Receiver", "type": "builtin", "value": "payout_receiver_name"},
    {"name": "Category", "type": "builtin", "value": "category"},
    {"name": "Status", "type": "builtin", "value": "status"},
    {"name": "Amount", "type": "builtin", "value": "amount"}
]
Custom configuration
Columns can be customized to fit the needs of your platform. To override the default columns, pass the column specifications as a JSON payload in columns.
<rainforest-payout-report
    columns='[{"name":"Scheduled date","type":"builtin","value":"scheduled_payout_date"}]'
></rainforest-payout-report>
A column specification needs a name, type, and value.
name: The display header for the column.type: Set tobuiltinormetadata.value: The key for the value to display. See the valid column values below.
Valid column values
| Type | Value | Filterable | Sortable | Description |
|---|---|---|---|---|
builtin | id | Yes | No | The unique identifier for the payout. Corresponds to the payout_id field. |
builtin | created | Yes | Yes | The datetime the payout was created. Corresponds to the created_at field. |
builtin | payout_receiver_name | No | No | The name of the payout receiver. Corresponds to the payout_receiver.name field. |
builtin | merchant_name | No | No | The name of the merchant. Corresponds to the merchant.name field. |
builtin | category | No | No | The payout category. Corresponds to the category field. |
builtin | status | Yes | No | The status of the payout. Corresponds to the status field. |
builtin | amount | No | No | The amount of the payout. Corresponds to the amount field. |
builtin | requested_payout_date | No | No | The date the merchant requested the payout for. Corresponds to the requested_payout_date field. |
builtin | scheduled_payout_date | No | Yes | The date the payout is scheduled to process. Corresponds to the scheduled_payout_date field. |
metadata | JSONPath to metadata key | No | No | The metadata for the payout. Corresponds to the metadata field. |
Metadata column
A column can display a custom metadata value set on the payout. The value for type metadata should be a valid JSONPath to the metadata key.
For example, a payout created with the following metadata:
{
    "invoice": {
        "id": "123",
        "vendor_email": "[email protected]"
    }
}
could have the following column specification to display the invoice ID:
{
    "name": "Invoice ID",
    "type": "metadata",
    "value": "$.invoice.id"
}
Templating columns
Specify a template to format the metadata for display. The pattern {{value}} is replaced with the value of the field. For example, this template displays the invoice ID as "Invoice #123":
{
    "name": "Invoice ID",
    "type": "metadata",
    "value": "$.invoice.id",
    "template": "Invoice #{{value}}"
}
Hyperlinks
The template can also be valid HTML to make a metadata column a hyperlink. For example, this template makes an email a mailto link:
{
    "name": "Vendor email",
    "type": "metadata",
    "value": "$.invoice.vendor_email",
    "template": "<a style=\"color:blue;text-decoration:underline;\" href=\"mailto:{{value}}\">{{value}}</a>"
}
Data filters
The payout report can be pre-loaded with a defined set of filters, including sort by and sort order. Data filters are defined by a JSON payload of key-value pairs passed into the data-filters prop. To pass multiple values for a key, define the value as an array.
A valid key includes any of the query params from the List payouts endpoint.
{
    "merchant_id": "mid_123",
    "status": ["SCHEDULED", "IN_REVIEW"],
    "sort_by": "scheduled_payout_date",
    "sort_order": "asc"
}
Data filters are always applied to the report. Any filtering the merchant does in the component is in addition to the filters passed in.
Component session constraints
If the component session includes constraints to a specific resource, such as a merchant, then the data filters must be at least as restrictive. Component sessions do not filter the report, so a session constrained to a merchant needs the report pre-loaded with payouts filtered to the same merchant:
<rainforest-payout-report
    session-key="REPLACE_ME"
    data-filters='{"merchant_id": "REPLACE_ME"}'
></rainforest-payout-report>
If the report tries to load payouts the session does not have access to, the request errors with a status code of 401 Unauthorized, and the response explains why the request is not valid:
{
    "status": "ERROR",
    "data": null,
    "errors": [
        {
            "field": "Authorization",
            "code": "AuthUnauthorized",
            "message": "Permission denied: Request parameter not specified for constraint merchant"
        }
    ]
}
Event listeners
The Payout Report Component will emit the following events as the merchant interacts with it.
| Event | Description |
|---|---|
row-selected | Merchant clicked on a row in the Payout Report Component. Rainforest will automatically open the Payout Details Component unless the details-view prop is set to disabled. |
payout-canceled | Merchant canceled a scheduled payout from the Payout Details Component. Requires the cancel-payout allowed action. |
You may listen for the events above as needed. In the case of row-selected, you can obtain the corresponding payout from the event data. In the case of payout-canceled, you can obtain the payout ID.
Sample event listening
var component = document.querySelector('rainforest-payout-report');

component.addEventListener('row-selected', function (event) {
    // Get the payout
    const [payout] = event.detail;
});

component.addEventListener('payout-canceled', function (event) {
    // Get the payout ID
    const [payoutId] = event.detail;
});
Listen to webhooks
Subscribe to the payout webhooks to keep your platform in sync with the life cycle of each payout.
Sandbox simulation
In the Sandbox environment, payments and payouts do not move on an automatic schedule, which allows you to have more control over testing.
To test the Payout Report Component in Sandbox:
- Activate the payout receiver. A third-party payout receiver stays Verifying in Sandbox after they are submitted. Move them to Active via the simulate payout receiver endpoint. A merchant paying themselves is already Active.
- Make funds available. Simulate the merchant's payments completing via the simulate merchant complete payments endpoint. This transitions all the merchant's payments with the status of Processing to Succeeded, so the funds are in the merchant's available balance.
- Schedule the payout. Schedule the payout from the Payout Report Component, or create it the same way your platform does in Production.
- Simulate the payout status. Move the payout through its statuses via the simulate payout status endpoint: Processing, Succeeded, Failed with a failure code, Returned with an ACH return code, or Canceled. The Payout Report Component shows each status change, and you can test all webhooks for payouts that you will receive in Production.
Updated about 6 hours ago